The Solar Camera Test That Changed Where I Mount Every Unit Now
 Jordan HaleStaff Writer
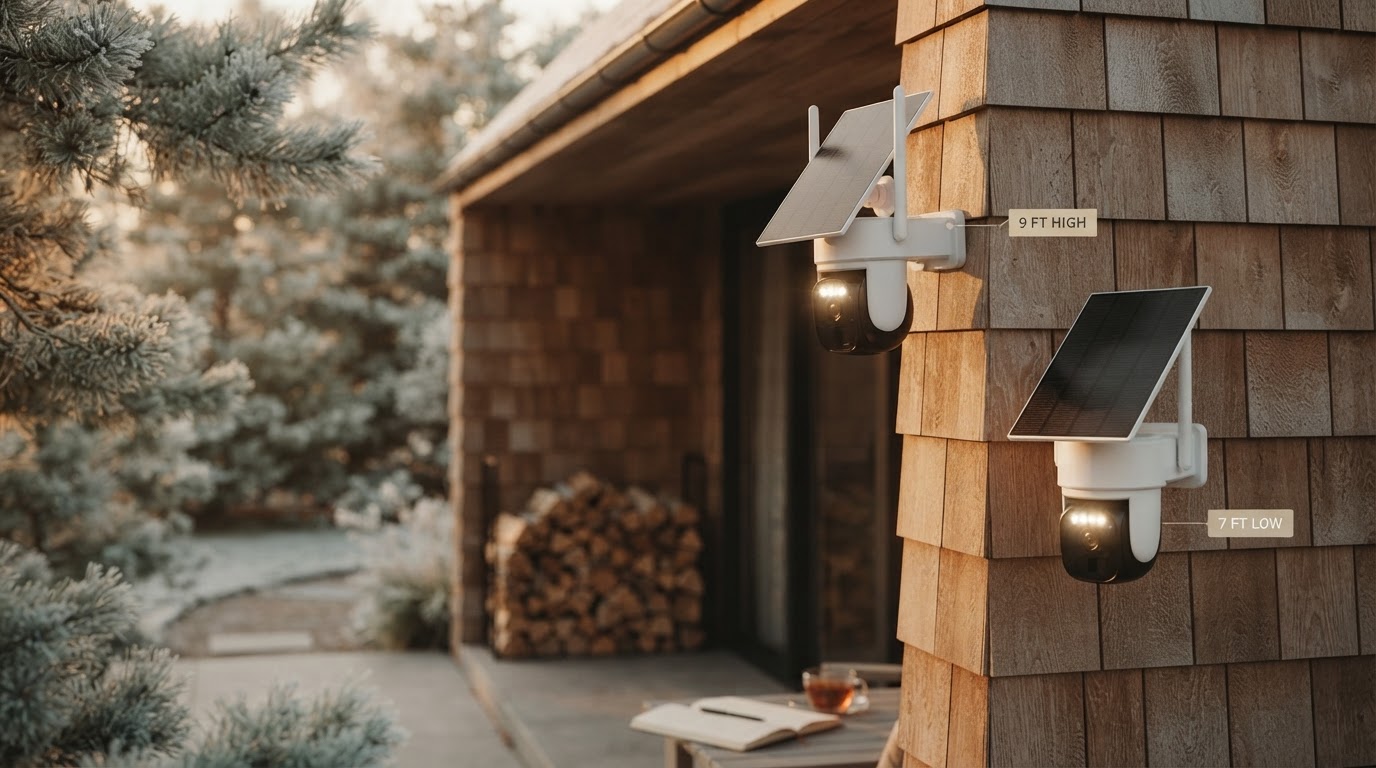
I changed my default solar security camera mounting height after one eight-day winter test: the camera with the “prettier” 9-foot view lost 18 battery points, while the slightly uglier 7-foot side-angle mount gained 6 points and recorded 63% fewer nuisance clips.
That result surprised me because I used to think of placement mostly as a visibility problem: can the camera see the gate, driveway, porch, or shed door? After installing and re-checking outdoor solar security cameras in yards, alleys, barns, side gates, and rental properties, I now treat placement as a power-and-motion problem first. The view still matters, obviously. But if the camera spends December waking up for every passing car, or if the panel gets one skinny hour of low-angle sun behind a maple tree, the sharpest view in the world will not help.
This is the framework I use now before I drill holes.
The non-obvious part: the panel is not the only thing charging the system
A solar camera’s battery is really being “charged” by three things:
Most buyers obsess over the first one. I did too. But in the field, I have seen a mediocre panel position outperform a sunny position when the sunny position faces traffic, tree shadows, flags, pets, or headlights.
Solar input is limited by physics. The U.S. Department of Energy explains that photovoltaic cells generate electricity from sunlight, but output changes with irradiance, angle, temperature, and shading. NREL’s PVWatts calculator makes the same point in practical terms: seasonal sun hours vary dramatically by location and month. A panel that feels “fine” in May can be starved in December.
The battery side is just as important. Every wake-up, night-vision burst, Wi-Fi transmission, and cloud upload has a cost. I have watched cameras drain more from unnecessary motion events than they gained from a half-decent afternoon of sun.
My eight-day placement test
Photo by Will Freeman on Pexels
This was not a lab test. It was a practical field check on a detached garage and side driveway using the same model of outdoor solar security camera, the same Wi-Fi network, and the same app settings: 1080p recording, medium PIR sensitivity, 15-second clips, infrared night vision, and push notifications on. Weather was mixed: four cloudy days, two bright days, two partly cloudy days. Overnight lows were roughly 27°F to 38°F.
I tested four mounting positions that I see homeowners choose all the time.
| Mount position | Sun window observed | Main motion trigger | 8-day battery change | Recorded clips | Useful clips | |---|---:|---|---:|---:|---:| | 9 ft, front-facing driveway | 2.0–2.5 hrs/day | Passing cars + headlights | -18 percentage points | 214 | 19 | | 7 ft, side-angle toward gate | 3.0–3.5 hrs/day | People entering gate | +6 percentage points | 79 | 31 | | 11 ft, under eave | 0.5–1.0 hr/day | Wind-blown shrubs | -24 percentage points | 168 | 12 | | 6.5 ft, post-mounted panel offset | 4.0–4.5 hrs/day | Gate latch area | +14 percentage points | 64 | 28 |
The post-mounted setup charged the best, but the side-angle gate mount was the one I would actually choose for most homes. It had enough solar exposure, fewer wasted clips, and a more useful face-and-body view than the high driveway shot.
The high front-facing position looked better at first glance. It showed the whole driveway. But it also captured the road, headlights, and vehicle movement that did not matter. By day three, I already knew it would be a battery problem.
My take: mount lower than your instinct says, but angle smarter
My take: Most solar security cameras are mounted too high and too straight-on.
That runs counter to the old security-camera habit of putting cameras as high as possible to prevent tampering. For wired cameras with continuous power and wide hard-drive storage, high mounting can make sense. For solar cameras, height often creates three problems:
- The camera sees too much irrelevant background motion.
- Faces become smaller and steeper, especially near doors and gates.
- The solar panel ends up tucked under an eave or pointed at a poor angle.
Passive infrared motion sensors tend to detect cross-motion better than someone walking directly toward the camera. That is one reason a side-angle view can feel more reliable. It also lets you exclude the road, sidewalk, or neighbor’s trees from the active zone.
The 3-zone decision framework I use before drilling
Before installing, I divide the scene into three zones.
Zone 1: the evidence zone
This is where I need usable detail: a face near a gate, a hand at a latch, a package at a porch, a license plate in a short driveway, or movement at a shed door.
I try to keep this zone within roughly 10 to 25 feet of the camera for general identification. Beyond that, many battery cameras still “see” motion, but the recorded detail may not be as useful as people expect.
Zone 2: the motion zone
This is what wakes the camera. I want the motion zone to cover the path a person must cross, but not every branch, road, sidewalk, or reflective surface nearby.
If the camera app has detection zones, I set them aggressively. I would rather miss the far edge of the sidewalk than record 90 car clips a day. If the camera uses PIR plus app-based detection, I still aim the physical camera carefully; software zones cannot fix every bad angle.
Zone 3: the solar zone
This is the sun path for the panel, not the camera. I check it separately.
I stand where the panel will sit and look for the southern sky if I am in the northern hemisphere. Then I check what blocks it: roofline, fence top, gutter, tree limbs, second-story wall, parked RV, or even the camera body itself. In winter, the sun is lower, so obstructions that do not matter in July can matter a lot in January.
For a quick check, I like using a phone compass and a sun-path app, but the old method still works: look at the spot at 9 a.m., noon, and 3 p.m. If it is shaded at all three, do not expect miracles.
What standards actually matter outdoors
A solar camera is an outdoor electrical device, so I pay attention to ingress protection. The IEC 60529 standard defines IP ratings for dust and water protection. In plain English, an IP65-rated device is dust-tight and protected against water jets; IP66 increases water-jet protection; IP67 addresses temporary immersion under defined conditions.
For most residential outdoor camera installs, I am more concerned with water direction and cable entry than the rating printed on the box. A camera mounted under an eave can still fail if water runs down the solar-panel cable into the port. I always make a drip loop: the cable dips below the connector before rising into it, so water falls off the low point instead of traveling into the camera.
Consumer Reports has also warned buyers to consider privacy, app security, and placement when choosing home security cameras. I agree. A camera that watches a public sidewalk, neighbor’s window, or shared alley can create privacy headaches even if your intention is normal home security.
Cold weather changes the math
Battery behavior is another reason I do not cut solar exposure too close. Lithium-ion batteries do not perform the same in cold weather. The National Renewable Energy Laboratory and other battery researchers have documented that temperature affects battery capacity, internal resistance, and charging performance.
In ordinary homeowner terms: a camera that coasts through summer at 92% can slide downward in winter, especially if it records lots of night clips. Night clips are expensive because the camera may use infrared LEDs, wake the radio, process motion, and upload video while the battery is cold.
Here is the winter rule I use: if a camera cannot gain charge on at least one decent sunny day after two cloudy days, the installation is too close to the edge. I either move the panel, reduce false triggers, shorten clips, lower sensitivity, or add a larger/remote solar panel if the camera supports it.
Practical mounting checklist
This is the checklist I use on real installs.
Before drilling
- Check Wi-Fi at the exact mounting point. I look for stable signal, not just one speed-test result. A weak connection wastes battery because uploads and reconnections take longer.
- Watch the scene for five minutes. Count cars, branches, pets, flags, reflections, and people. If I see constant motion, the camera will too.
- Find at least 3 hours of usable sun. More is better, but three honest hours often works if motion events are controlled.
- Separate camera view from panel view. If the camera angle is perfect but shaded, I use a remote panel when possible.
- Avoid pointing directly at roads. A driveway angle across the entry point is usually better than a wide view of everything.
- Plan the cable drip loop. Water should not run into the charging port or connector.
- Stay off flimsy trim. Wind vibration creates blurry clips and can loosen mounts.
After mounting
- Run a 48-hour event audit. I count total clips and useful clips. If fewer than one in five clips is useful, I adjust the angle or zones.
- Check battery trend, not one number. A camera dropping from 88% to 84% after a cloudy day is normal. Dropping daily after sun returns is not.
- Test at night. Many bad installs look fine in daylight and fail because IR reflects off a wall, post, gutter, or white fence.
- Walk the real path. I test from the sidewalk, gate, car door, and porch, not just by waving under the camera.
- Recheck after a storm. Wind can rotate a small panel or move branches into the solar zone.
Where I would mount common home setups
Photo by Matthew Jesús on Pexels
For a front porch, I like a side wall looking across the approach, not straight out to the street. The panel may need to sit above the porch roofline or on a nearby fascia with a drip loop.
For a driveway, I avoid trying to see the entire street. I aim for the vehicle entry point or the area where someone would approach car doors. If license plates matter, I keep expectations realistic; many battery cameras struggle with plates at night because of motion blur, angle, and reflective plate material.
For a side gate, I mount around 7 feet high, angled across the latch area. This is one of the highest-value uses for a solar camera because there is usually a clear path, limited traffic, and good evidence if someone enters.
For a shed or barn, I often separate the camera and panel. The camera belongs where it sees the door and approach. The panel belongs where it sees the sky. Those are rarely the same spot on outbuildings.
For a backyard, I point away from trees and toward pinch points: stairs, gates, patio doors, or tool storage. A wide backyard panorama is satisfying for live view, but it is usually bad for motion accuracy.
The setting changes that save the most battery
When a solar camera is draining, I change settings in this order:
I do not start by lowering video quality unless I have to. A security clip that is too soft to identify anything is not much of a security clip.
FAQ
How much direct sun does an outdoor solar security camera need?
I aim for at least 3 to 4 hours of direct, unobstructed sun on a typical day, with more margin in cloudy climates or winter. Some cameras can maintain charge with less if they record very few events, but I do not like designing an install around perfect conditions. If the location gets only one hour of winter sun, use a remote panel or choose a different mount.
Is a higher mounting position safer?
Sometimes, but not always. Higher mounting can reduce tampering risk, but it often worsens face detail, PIR detection, and solar-panel placement. For most residential gates, porches, and shed doors, I prefer about 6.5 to 8 feet with a side angle. If vandalism is a serious concern, I add a more secure bracket or place the camera just out of easy reach rather than pushing it so high that the footage becomes less useful.
Do solar security cameras work in winter?
Yes, but winter exposes weak installs. Shorter days, lower sun angles, cold batteries, and more night recording can all reduce margin. The install needs enough panel exposure and low false-trigger volume. My rule is simple: after a cloudy stretch, the battery should recover on the next decent sunny day. If it does not, the panel angle, event settings, Wi-Fi, or mounting location needs work.
What IP rating should I look for?
For outdoor residential use, I generally look for at least IP65 from a reputable product line, and I still install it as if water will try to find the connector. IP ratings are based on defined tests, not every real-world storm angle or cable mistake. Use a drip loop, keep ports sealed, avoid upward-facing connectors, and inspect gaskets after maintenance.
Final thought
The most reliable solar camera install is rarely the one with the widest view. It is the one that sees the right 15 feet, wakes up for the right motion, and gives its panel a clean look at the sky.
That is the shift that changed my installs: I stopped asking, “Can I see everything from here?” and started asking, “Will this camera still be charged, quiet, and useful after a bad week of weather?” If the answer is yes, that is the spot worth drilling.